Open topic with navigation
3D Import
from Trace Header
This is the easiest method to import 3D, as ProductName reads the X/Y coordinates and
the in-lines/cross-lines directly from the trace header.
- To use this method, make sure that your trace header includes your X/Y,
in-lines, and cross-lines.
Follow these steps to import the 3D data:
- Select the <3D
Import: XY-Coordinates, In-lines, Cross-lines in Trace Header>
button.
 View image

- Once you select this option, the <Leave
Dead Traces> button will appear. By assumption, dead traces
have incorrect trace headers, so
ProductName interpolates X/Ys for the dead traces. Click this button to drop dead
traces (the button will change to read <Drop
Dead Traces>). The dropped traces will remain in your SEG-Y
file, but ProductName will not display
them on your seismic.
- If you plan to import additional processing versions,
do not drop dead traces.
- Select the Convert
Coordinates check box if you want to modify the projection or datum
information (For example, if you want to covert the data from NAD27 to
NAD83).
- Type parameters into the Change
of Trace to Trace Distance Tolerance field and the Cross-Line
Min. Acceptable Bin Size field, as appropriate. The defaults are usually
acceptable.
- Click <Next>
to proceed to the Import
Wizard Step 2 of 3: 3D XY Coordinate, In-Line, and Cross-Line Import Properties
dialog box. View image
- If you selected the Convert Coordinate
check box, the Project Conversion
Parameters dialog box will open before this next window so
that you can apply the coordinate conversion.
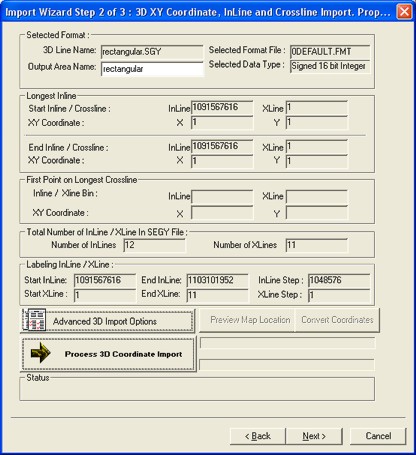
- Most options in this dialog box appear dimmed because ProductName reads the X/Y coordinates and in-lines/cross-lines directly from the trace
header. Check that all parameters are correct.
- If
necessary, click <Advanced 3D Import Options>
to configure additional options for your import.
- Click
<Process 3D Coordinate Import>
to import your coordinates.
- You can view the import process on the Status
bar at the bottom of the dialog box. When the import completes, this bar
will read 3D Import Done.
- Click
<Preview Map Location> to
view your 3D data's coordinate locations in the Map
window.
- Click
<Next> to proceed to the
Line
Intersections and Seismic Import Properties dialog box.
What do you want to do?