You are here: Working with the Well Spot Database > Well Information > Checkshots > Edit Checkshots

Edit Checkshots

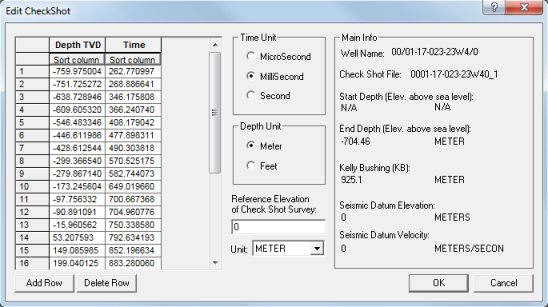
You can use the Edit Checkshots dialog box to modify an existing checkshot, or to enter a new checkshot from scratch.

Open the edit checkshots dialog box

CollapsedView image

  1. From the Application toolbar, select | Well Database to open the Well Spot Database dialog box.
  2. Double-click on the borehole you would like, or highlight it and click <Edit> to open the Edit Well Spot dialog box.
  1. Click Checkshot | Edit to open the Edit CheckShot dialog box.
  2. From here you can edit or manualy create a new checkshot.

Edit checkshots

You can make the following edits to the settings of your checkshot:

Manually enter in new checkshots

  1. From the Edit Checkshot dialog box, click <Add Row>.
  2. Select the units for Time and Depth from the options to the right of your rows.
  3. Enter in the values for Depth TVD and Time in their respective columns.
  4. Repeat steps 1-3 until you have entered all the data points for your checkshot.
  5. Click <OK>to open the CheckShot Name dialog box.
  6. Assign your checkshot to the well spot you would like it linked to.

The following options are also available by clicking Checkshot on the Well Spot Database dialog box.

Option

Description

Assign Checkshot

Allows you to select a saved checkshot and associate it with a well.

Unassign Checkshot

Removes the checkshot's association with the well, but the checkshot will remain in the checkshot database.

Delete Checkshot

Deletes the checkshot from the database completely.

What do you want to do?