Open topic with navigation
You are here: Working in the Map window > Fences > Create a Fence in 2D Mode
Create
a Fence in 2D Mode
Use 2D Mode to create fences composed of 2D line segments. Follow
these steps:
to create fences composed of 2D line segments. Follow
these steps:
- Zoom
your map to the location where you want to create your fence.
- Click
 to turn on Fence
Mode (or press <f>
on your keyboard).
to turn on Fence
Mode (or press <f>
on your keyboard).
- Click
 | to switch to All
Mode (or press <a>
on your keyboard).
| to switch to All
Mode (or press <a>
on your keyboard).
- Move your cursor to a point
at the end of a 2D line or to an intersection between 2D lines (your cursor
will turn into a circle), and left-click the seismic data in the Map window to begin the first
fence segment.
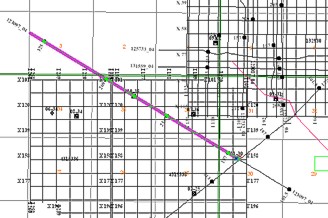
- Move your cursor to the end point of the line
(or to an intersection with another 2D line) and left-click to end the
first segment. WinPICS will highlight
the completed segment as a bold magenta line.
 View image
- By default, 2D mode selects lines in Snap
Mode, which means that you have to click on an intersection or
the end point of a line to create a segment. However, if you hold the
<Shift> key, you can switch
to Arbitrary Mode, which means
that you can click anywhere on the 2D line to create the fence.
- If you click on the map to create a segment, and you decide you didn't
want to click in that location, click
 (or press your keyboard's
<Backspace> key) to delete
that fence point.
(or press your keyboard's
<Backspace> key) to delete
that fence point.
- Continue creating segments in the same manner
until you have selected all the segments for your fence.
- Double-click the map to end your fence (alternatively,
you can select
 |
|  or press <Shift> + <d>
on your keyboard to end the fence). WinPICS
will highlight the selected lines in a bold yellow color, and it will
automatically open a Seismic
window to display your fence. View image
or press <Shift> + <d>
on your keyboard to end the fence). WinPICS
will highlight the selected lines in a bold yellow color, and it will
automatically open a Seismic
window to display your fence. View image

- To add a 2D line segment
to your fence that does not share an intersection with the current 2D
fence segment, click
 (or press <f>
on your keyboard) to insert a
fence gap, which displays as a dashed line extending from the end of the
last segment. Move your mouse to the desired location in the map, and
left-click to create the beginning of the line segment you want to join
to the current fence.
(or press <f>
on your keyboard) to insert a
fence gap, which displays as a dashed line extending from the end of the
last segment. Move your mouse to the desired location in the map, and
left-click to create the beginning of the line segment you want to join
to the current fence.
- You
can also add segments from other data types (For example, synthetic wells or 3D data). Read
more.
What do you want to do?