Open topic with navigation
Screen
Capture
You can capture an image of the contents of an active Map
window or Seismic
window, and send that image to the Windows
clipboard or to a printer installed on your PC.
Screen Capture To Windows Clipboard
- From the menu bar or menu bar, select .
- Open a graphics application such as Windows
Paint or a word processing application such as Word
(The application must be capable of accepting images from the clipboard).
- Press <Ctrl>
+ <v> on your keyboard to
paste the captured image.
Screen Capture To Printer
- From the menu bar or menu bar, select
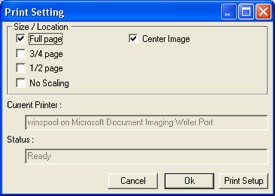
to open the Print
Setting dialog box.
 View image

- In the Size/Location
section, select a check box to set the size of your image. No scaling
means that WinPICS will map the
image pixels to the printer resolution.
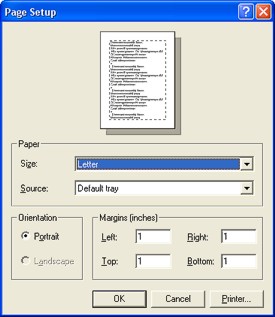
- Click <Print
Setup> to open the Page
Setup dialog box, where you can change the paper size, source,
orientation, and margins. These settings will affect the scaling of your
plot.
 View image

- Click <OK>
to apply your settings and return to the Print
Setting dialog box.
- Click <OK>
to print an image of the Map
window or the Seismic
window, whichever is applicable.
What do you want to do?
 View image
 View image
 View image