Open topic with navigation
Set Up a User Tops Database
GeoVista gives you the ability
to edit user tops, and to save those edits in a database. If you want
to use this option, your systems administrator must first set up your
connection to the database.
System Administrator Steps
Follow these steps to set up a user tops database for a single user,
with Jet.
- If you want to set up a user tops database on a server, so that multiple
users can access the data and make changes, you will need to set up a
SQL server connection and create a SQL server user tops database. Contact
Divestco Support for assistance.
- From the client's workstation,
search your network for the server install.
- In the GeoVista
folder, double-click the usertopdbmngr.exe
file to open the Usertop
Database Manager dialog box.
- Click <Connect>
to open the Data
Link Properties dialog box.
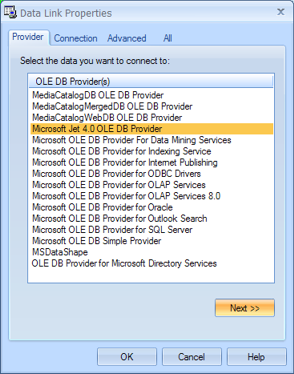
- On the Provider
tab, select Microsoft Jet 4.0
OLE DB Provider and click <Next>.
- On the Connection
tab, enter the location of the user tops database shipped with GeoVista
(gvusertops.mdb), or if you already have a user tops database, enter that
location. To search the computer, click the ellipsis button <...>. Leave the default values for
the remaining fields.
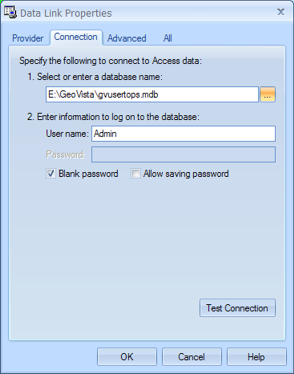
- Click <Test Connection> to check if GeoVista can successfully link to your
database.
- Click <OK>
to establish the connection and open the Login
dialog box.
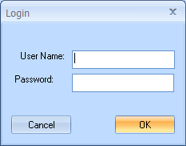
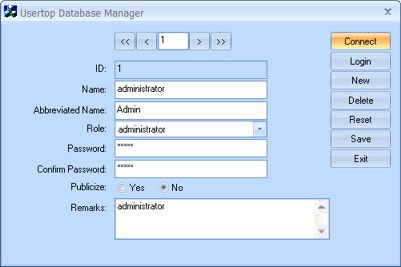
- For User
Name, enter admin, and
for Password, enter admin.
Click <OK>. You will see
a Login Successful
message.
- Click <OK>.
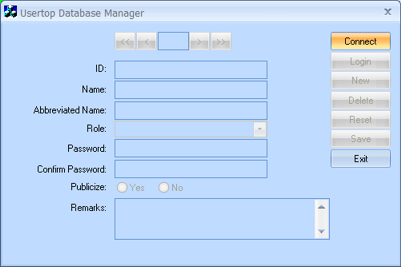
The Usertop Database
Manager dialog box will appear with default user details.
- Click <New>
to create the client's log on information.
- In the Name
field, enter the client's name, for example, Tech Writer.
- This might be the name of a user or the name of a company, depending on
the type of associated database. If your company has spent considerable
time and money developing a user tops database with exactly the information
you want, then you should enter a name that will identify this database.
- Enter a shorter name (typically
the client's initials), in the Abbreviated
Name field.
- The abbreviated name will display next to any edits this client makes
in the user tops database.
- From the Role
list, select User. Or, if you
are setting up a user name for a large database that other users might
want to import into their GeoVista database, set the Role to Super User.
- There are four user
types, each with a different level of access: Administrator
(handles user accounts and has full rights), Super
User (can import, edit, and view), User
(can edit and view), and Restricted User (can only view).
- Assign a password for the
user.
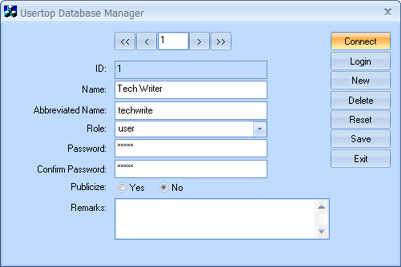
- Click <Save>
to add the new user.
- Click <Exit>
to close the dialog box.
- Launch the client's GeoVista software install.
- From the Main Menu bar, select Options
| User Tops Database to open the Data
Link Properties dialog box.
- Make sure this dialog box
has the same settings you entered earlier. Typically, GeoVista
retains your earlier settings.
- Click <Test
Connection>. You should see a Connection
Successful message.
- Click <OK>.
- From the Main
Menu bar, select Options | Identify
User to open the Identify
User dialog box.
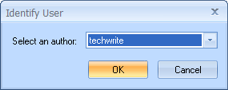
- Choose the client's abbreviated
name from the Select an Author
list, and click <OK>.
- The client can now edit the
tops for any wells.
What do you want to do?