Open topic with navigation
Exporting
Interpretation
You can export your horizons, faults, or isochrons from ProductName into a number of other software packages. Follow these steps:
- From the Application toolbar, select

 View image
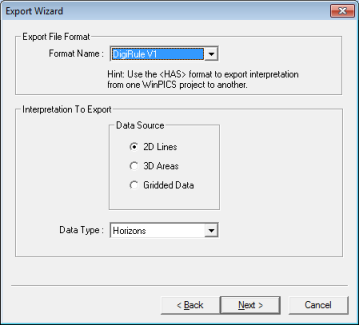
- Select the export file format from one of the following options:
|
HAS
|
Surfer
|
XGeo
|
ZyCor
|
SEGP1
|
|
Landmark
|
MCS
|
Paragon
|
Radian
|
SeisX |
- Use the HAS format to export interpretation from one ProductName project to another.
- Select to export Data Source: 2D lines, 3D areas, or gridded data.
- Select to export horizons, isochrons, or faults from the menu.
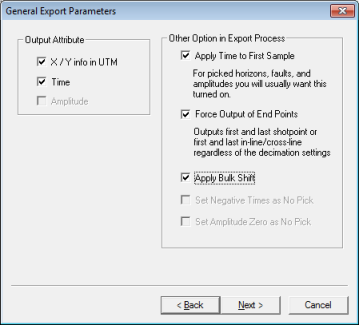
- Click <Next>to continue. Enable items you wish to output by selecting the check box next to them in the General Export Parameters dialog box. View image
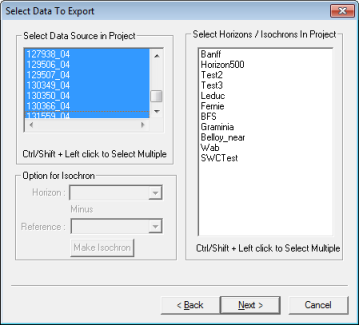
- Click <Next>again. Select the 2D lines, 3D areas, horizons, faults, and/or
isochrons you wish to export in the Select Data to Export dialog box. View image
- Click <Next>again. Select how you wish to decimate your data (see 2D Decimation window or 3D Decimation window).
- Click <Next>again to continue to the final window in the Export Wizard. This window contains a list of 2D lines, 3D areas, horizons, and faults for exporting. Modify the decimation parameters of individual lines and areas from this window by clicking on the 2D line or 3D area. A window containing a list of decimation parameters will open. Review the decimation parameters or preview the affect of your settings on the output file by clicking <Preview>. Click <OK> to use these settings for output and return to the previous window.
- Click <Finish> to output file.
- In the window that opens, provide a filename and destination directory. By default, the destination directory is set to the export folder in your project file.
- You will notice that some options in the
Export Wizard appear dimmed. This is because certain export formats do not support some of
the options. For example, GeoGraphix V3 accepts amplitude values, while
ProductName does not.