Open topic with navigation
Print a Seismic Plot
 View image
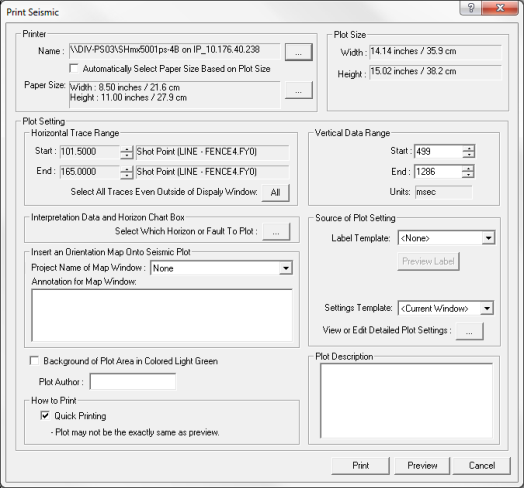
Use the Print Seismic dialog box to set up your Seismic window for printing. To open the Print Seismic dialog box, click  on the Other Tools toolbar, or from the Seismic
Menu bar, select Print
| Print Seismic.
on the Other Tools toolbar, or from the Seismic
Menu bar, select Print
| Print Seismic.
About the print seismic dialog box options
You have the following options:
- - In this section, you can select a printer to use, turn the auto size paper on or off, and set your paper size.
- - In this section, ProductName displays what the size of your plot is.
- and
- You can change the range information in these sections.
- - Click <Select
Which Horizon or Fault to Plot> to open the Seismic Interpretation Elements
dialog box to select which horizons and faults to display.
- - To insert a map display onto the seismic plot, select
a project name from the Project Name of Map Window
list. The scale in which the map displays will depend on the current zoom
state of the map.
- - In this window, type an annotation comment for the orientation map. This comment will display under the map in your plot.
- - You can use the options in this section to set up your plot display.
- - You can select a label template to add to your plot. You can click <Preview Label> to see an image of the label as it will appear printed.
- - You can select a plot setting from a ProductName template, or from the current data window display.
- <View or Edit Detailed Plot Settings> - Click to open the Seismic Plot Display Options dialog box, where you can edit the seismic display properties.
- Use templates to apply plot parameters to your current plot. You can apply
the settings from a saved template. Read more.
- Saving your parameters to a template enables you to plot quick seismic
displays or maps using the same parameters.
- - Clear this check box if you want to remove
the green fill background from the plot.
- - Select the Quick Printing check box to plot directly to your plotter printer.
- - In this window, type in a description for the plot.
- You must have a minimum of a space in each line that you would like to show. If you want a blank line between other lines, type a space in that line.
- To start a new line in this box, press <Shift> + <Enter> on your keyboard.
- <Print>
- Click to send the completed
plot to the printer.
- <Cancel>
- Click to discard changes and
exit without printing.
- You can set up ProductName to display
an image, such as your company logo, at the bottom right of your plot.
Read more.
Prepare your plot for printing
To ensure your plot prints exactly as you want it, you will need to correctly set the printer and paper options. If your printer supports auto-sizing (For example, a properly configured HP
DesignJet printer),
select the Automatically Select Paper Size Based on Plot Size check box to automatically update the paper size each time you edit a setting that
affects plot size. However, for
all other print devices, auto-sizing is unavailable and you need to set up your plotting parameters. Follow these steps:
- From the Seismic
Menu bar, select Print
| Print Seismic to open the Print Seismic dialog box.
- Next to the Printer Name field, click <...>
to open the Print
dialog box, and select the printer you want to use.
- Next
to the Paper Size field, click
<...> to open the Page Setup dialog
box, where you can select a page size and orientation that will accommodate the plot size.
What do you want to do?