Open topic with navigation
Manually Enter Well Survey
Enter in well survey data so the track for non-vertical wells displays accurately. The track for a deviated well will be displayed on your maps if survey
data has been imported or manually entered for the well, and if survey X, Y,
and Z values have been computed. See Importing Well Surveys.
You can enter in the information from the Well Database dialog box or from the Map Window.
Enter survey information from the well database
- On the Application toolbar select
 | to open the Well Spot Database dialog box.
- Highlight the well you want to add survey information
for, and click <Edit> to open the Edit Well Spot dialog box.
- Highlight the borehole
this survey is for.
- Click <Survey>, and select to open the Well Survey dialog box.
 View image
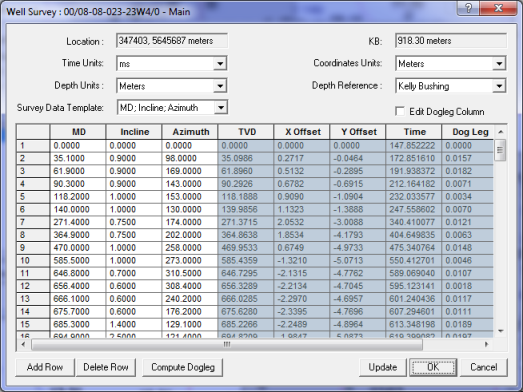
- Specify the units for time, X/Y coordinates,
and depth.
- Click <Add Row>, and enter the measured depth, inclination and azimuth from your survey. Repeat until you have entered all the survey values.
- Click <Compute Dogleg> to get a good estimation of the true vertical depth and dogleg severity inside the well. You'll get a message if any required data (measured depth, inclination, or azimuth) is missing. After you click this button, the values display in radian.
- The difference between your start depth and end depth must be a minimum of 25 meters, or 83 feet.
- Click <Update> to calculate the survey time using the time/depth curve. When you make changes and click this button, you'll update all the values within the gray shaded area of the dialog box.
- If your <Update> button is grayed out it means there is no checkshot assigned to the well spot. For further information, see Edit Checkshots.
Enter survey information from the map window
- Click
 (or press <Ctrl> + <W> on your keyboard), and click on the well spot to open the Edit Well Spot dialog box.
- Follow steps 2-8 in the section above.
- For vertical boreholes, the values of inclination and azimuth will be 0 for the top and bottom of the hole.