Open topic with navigation
You are here: Working in the Map window > Gridding > Create a New Grid From Well Tops
Create a New Grid From Well Tops
Use New Grid From Well Tops to generate a grid from selected well tops.  View image
You can generate the list of wells to grid either by selecting them from a list, or by capturing the wells on the map by drawing a polygon around them.
Wells from list
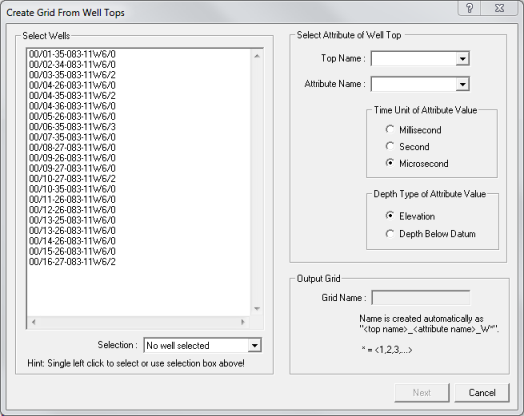
Follow these steps:
- On the bar, select to open the Create Grid From Well Tops dialog box.
- Select wells from the list. ProductName will use only tops from these wells to generate the grid. You can use the drop-down list below the window to extend the list, or select all or none of the wells.
- Select the Top Name and Attribute Name to grid on.
- If necessary, change the Time Unit and Depth Type for the attribute's value.
- Click <Next>. The Gridding dialog box opens. Here, you can set the grid area, grid density, gridding method, and trend treatment for your horizon grid, and then execute the grid.
Wells from map
Follow theses steps:
- On the bar, select to turn your cursor into a pencil.
- Move the cursor over your map and click to draw a polygon around the wells you want to grid. Make sure the shape you draw fully encloses the area with the wells.
- Right-click inside the polygon to open the Create Grid From Well Tops Inside of Polygon
dialog box. The wells in the map polygon display in the Select Wells list.
- Select the Top Name and Attribute Name to grid on.
- If necessary, change the Time Unit and Depth Type for the attribute's value.
- Click <Next>. The Gridding dialog box opens. Here, you can set the grid area, grid density, gridding method, and trend treatment for your horizon grid, and then execute the grid.
What do you want to do?