Open topic with navigation
Export to Excel
WinPICS
can export the information stored in the Well Spot Database dialog box to any installed version of Microsoft
Excel.
To export information, you first need to open the Well
Spot Database dialog box and select the wells you want to export from the Well window (hold the <Ctrl>
key or the <Shift> key to select multiple wells. Then, click <Export
to Excel> and choose one of the following options:
- The time required for WinPICS
to copy the well information to Excel will depend on the number of wells you selected to export.
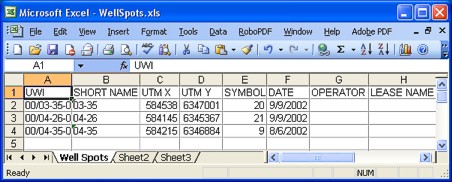
- Well
Spots - Exports your selected well's well-spots to an Excel spreadsheet.
 View image

- Well Tops- Exports your selected well's tops to an Excel spreadsheet.
 View image

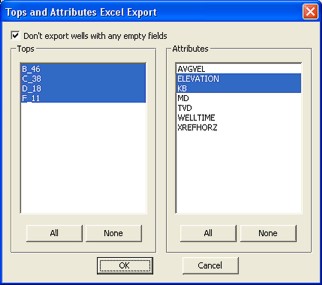
- Well Tops Extended - Opens the Tops
and Attributes Excel Export dialog box.
 View image

Follow these steps to export well tops and attributes:
- Click to select the Tops
you want to export. Hold the <Ctrl>
key or the <Shift> key to
select multiple tops.
- Click to select the Attributes you want to export. Hold the <Ctrl> key or the <Shift> key to select multiple attributes.
- Select the Don't
Export Wells With Any Empty Fields check box if you want to filter
out wells that don't include every attribute. This is useful when you want to perform math on the exported information. If you don't select this check box, you will need to write an equation that understands what to do with blank fields. On the other hand, if you just want to look at all the information, and you don't intend to perform any math on the results, you can clear this check box.
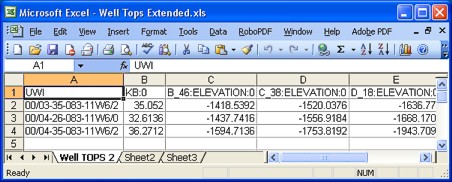
- Click <OK> to export your results to an Excel spreadsheet.
 View image

 How can I edit attributes in an Excel file?
The column heading for each attribute in your Excel file is written in the following format:
<Top Name>:<Attribute>:<Borehole Number>
For example: B_46:Elevation:0
If you want to add a new attribute to your Excel spreadsheet, you must write the new column heading using the same naming convention
In order to see this new attribute on your map, you can import from Excel and then post
that information to your map.
- To check that your information imported to the map, view its attributes.
You can also use the same dialog box to post tops independently from horizons.
Read more.
What do you want to do?
 View image
 View image
 View image
 View image
 View image
 How can I edit attributes in an Excel file?