Open topic with navigation
Well
Spot Database
 View image

 How to open the well spot database
On the Application toolbar select  .
.
About the well spot database dialog box
The Well
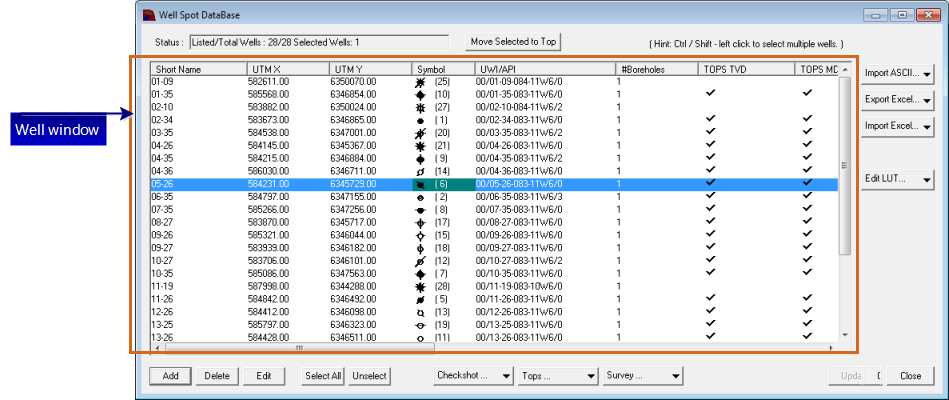
Spot Database dialog box contains a list
of all the well spots in your WinPICS project, as well as the information
for each well, such as short name and symbol. You can view and work with your well spots using the following features:
- - Displays the number of wells in your project, in the well spot database, and selected in this dialog box. For example, if the box shows Listed/Total Wells: 14/25 Selected Wells: 6, that means 14 of the 25 wells in your project are listed in the Well Spot DataBase dialog box, and six of those wells are currently selected in the Well window.
- <Move Selected to Top> - Arranges all of your selected wells at the top of the Well window.
- If the wells you are interested in are located throughout a long well list, hold the <Ctrl> key down and click to select each well individually. Then click <Move Selected to Top> to display all of the selected wells at the top of the Well window.
- Well
window - Displays a list of all the wells
in your project, and identifies the type of information available for
each well, including if it has boreholes, TOPS depth, or logs.
- - Displays all of your project's wells in the Well window.
- This button is only available if you added the wells to this dialog box from an area of the map. Otherwise, the Well Spot DataBase dialog box always shows all of the wells in your project by default.
- <Import ASCII> - Displays a list of import options. Read
more.
- <Export
Excel>- Exports your
selected wells to an Excel file. Read more.
- <Import
Excel> - Displays a list of options for you to import data
from an Excel file. Read more.
- - Open a text editor, where you can customize the synthetics for your wells. Read more
- <Add>
/ <Edit> - Enables
you to manually add or edit objects to your well spot database. Read
more.
- <Del>
- Delete wells
in your project by highlighting a well and clicking <Del>.
- <Select All> - Select all of the wells in the well list.
- <Unselect> - Undo all of the well selections.
- <Checkshot
...> - Displays a list of options for you to manage your
well checkshots. Read more.
- <TOPS
...> - Displays a list of options for you to manage your
well tops. Read more.
- <Survey...> - Displays a list of options for you to manage your
well surveys. Read more.
- <Update> - Applies your changes to the database.
- While it applies the changes, the Well Spot Database dialog box disappears and is replaced by a status bar. When the save is complete, you can work in the dialog box again.
- <Close> - Closes the Well Database dialog box. WinPICS prompts you to save any changes you made. If you click <No>, then your changes will not be saved.
You can resize this dialog box in order to see more of your data. Click on a corner of the dialog box and drag to resize it.
You can leave the dialog box open while you work in the map, so you can instantly view the well spot database or map as your workflow moves from one to the other. If you edit well data from the Map window or Seismic window, WinPICS automatically selects the well in the Well Spot Database dialog box, and opens the Edit Well Spot dialog box.
Add wells from an area of the map
If you don't want to view all of the wells in your project, you can select to view only the wells from a particular area of your map. Follow these steps:
- Zoom the map to your area of interest.
- On the menu, select
 to turn your cursor to a pencil in the Map window.
- Draw a border around the wells you want to look at. Read more
- Right-click inside the border, and select . The Well Spot Database dialog box opens and displays a list of the wells found inside the border you drew on the map.
- If you send wells to the Well Spot Database dialog box using this method, WinPICS replaces any existing wells in the list with the new wells.
Locate a well in the map
You can center the map on any well currently displayed in the database. Follow these steps:
- Right-click on a well in the Well window to open the option.

- Select the option. WinPICS centers and zooms the map on the well you selected.
Dynamic well spot display
As you zoom in or out of your map, WinPICS changes the display of well spots to ensure clarity on the map. Depending on your current map scale, well spots display as well symbols of varying size, as points of varying size, or they may not display at all.
What do you want to do?
 View image
 How to open the well spot database
 Draw Polygons to turn your cursor to a pencil in the Map window.