Open topic with navigation
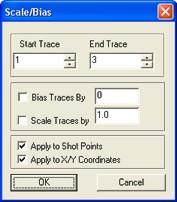
Scale/Bias
Use the Scale/Bias
dialog box to apply a scale factor or a bias to the shotpoints or X/Y
coordinates between two selected traces.  View image

Follow these steps:
- The Start Trace
list displays the number of your first selected trace. To select a different
trace, click the arrow buttons to scroll through the list of traces.
- The End Trace
list displays the number of your last selected trace. To select a different
trace, click the arrow buttons to scroll through the list of traces.
- WinPICSscales or applies bias
to all the traces between your selected Start
Trace and End Trace.
- If you want to bias the selected traces, select
the Bias Traces By check box,
and type a bias value into the field. For example, if you type 1000,
WinPICS will add 1000 to the
output of all trace values. In other words, it would output 567000 as
568000.
- If you want to scale the selected traces, select
the Scale Traces By check box,
and type a scale value into the field. For example, if you type 10, WinPICS
will divide all the selected trace values by 10. In other words, it would
output 1015 as 101.5 or 5675675 as 567567.5.
- Select the Apply
to Shot Points check box to apply the scale/bias to the shotpoints
in your selected traces.
- Select the Apply
to X/Y Coordinates check box to apply the scale/bias to the X/Y
coordinates in your selected traces.
- Click <OK>
to scale or bias your traces.
What do you want to do?
 View image
 View image