Open topic with navigation
Installation Defaults
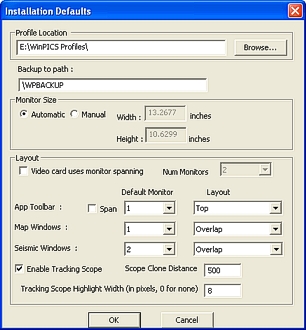
Use the Installation
Defaults dialog box, opened by clicking  on the Application toolbar
and selecting Installation Defaults,
to set the monitor and layout defaults for you WinPICS
projects.
  View image

You have the following options:
- Profile Location
- WinPICS automatically creates
a profile directory upon installation (C:\WiinPICS Profiles), and the
Profile Location field displays
the current path to the profiles folder. If you move the WinPICS
Profiles directory from its installation location, (C:\WinPICS
Profiles), you can click <Browse>
to set the path to the new location.
- Backup to Path
- Type in the location where you want to save the backup.
- Monitor
Size - These settings control the physical layout of your monitors.
Select Automatic to have WinPICS determine the monitor size
automatically, or select Manual
to change the dimensions in the Width
and Height fields.
- Video
Card Uses Monitor Spanning and Num
Monitors- Based on your computer's graphics adapter settings, WinPICS automatically determines how
to arrange the Application
toolbar, Map
window, and Seismic
window on your monitor. If you have two monitors on your computer, and
your graphics adapter is set to display your Windows
desktop as a single resolution (In other words, your Windows
taskbar is
stretched across both monitors), you need to select the Video
card uses monitor spanning check box and, from the Num
Monitors list, select the number of monitors controlled by your
adapter.
- Clear the Video card uses monitor spanning
check box if you are using multiple graphics adapters or running separate
resolutions on each monitor (In other words, your Windows
taskbar stretches across a single screen).
- Default
Monitor - From these lists, select in which monitor you want the
Application
toolbar, the Map
window, and the Seismic
window to open.
- Layout
- From these lists, select the default location to display the Application
toolbar, as well as how the Map
window and Seismic
window will automatically tile.
- Enable Tracking Scope: Select this option
to track a display across all open Map
windows and Seismic
windows.
- Scope Clone Distance: Type in the maximum
distance (in ) that the cursor can be from an object in order to activate
the tracking scope.
- Tracking Scope
Highlight Width: Type in the viewable extents of the data in the
seismic window. To turn off the scope highlight, enter 0
as the pixel size.
What do you want to do?
 on the Application toolbar
and selecting Installation Defaults,
to set the monitor and layout defaults for you WinPICS
projects.
  View image
 on the Application toolbar
and selecting Installation Defaults,
to set the monitor and layout defaults for you WinPICS
projects.
  View image