Open topic with navigation
Hand Enter Well Survey
The track for a deviated well will be displayed on your maps if survey
data has been imported or hand entered for the well and if survey X, Y,
and Z values have been computed. See Importing
Well Surveys.
Follow these steps:
- On the Application toolbar select
 |.
|.
- Highlight the well you want to add survey information
for and click <Edit>.
- In the Edit Well Spot dialog box, highlight the borehole
this survey is for.
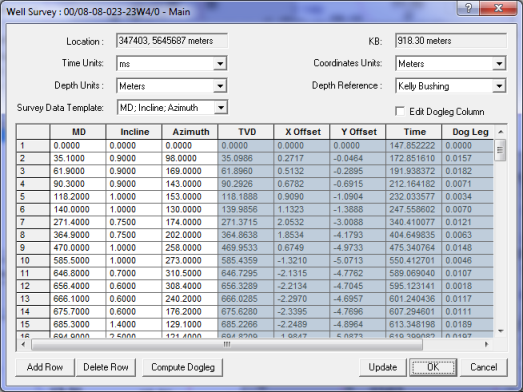
- Click <Survey> and select to open the Well Survey dialog box.
 View image

- Specify the units for time values, X/Y coordinates,
and depth values.
- Click <Add Row>, and enter the measured depth, inclination and azimuth from your survey.
Repeat until you have entered all the survey values.
- Click <Compute Dogleg>to get a good estimation of the true vertical depth and dog leg severity inside the well. You'll get a message if any required data (inclination and azimuth) are missing. After you click this button, the values display in radian.
- Click <Update> to calculate the survey time using the time/depth curve. When you make changes and click this button, you'll update all the values within the blue shaded area of the dialog box.
- You can also manually enter survey data by selecting the well from the map .
Press <Ctrl> + <W> and click on the well-spot, this will open the Edit Well Spot dialog box, and you can proceed as directed above. To display a well track for a vertical borehole proceed
as above. enter a measured depth for the start of the hole. Add an Inclination
of 0, a Azimuth of 0 and a time for the top of
hole. Repeat the process for the bottom of the hole.
- WinPICS cannot compute time without a checkshot or LAS.
 |Well
Database.
 View image
 |Well
Database.
 View image