Open topic with navigation
Posting Text Setup
To open this dialog box, click <Labels/Postings>
on the Layer
Name Properties dialog box. Use this dialog box to add text
to your maps, based on the fields available for the selected layer in
GeoVista's database. From each
of the eight database field boxes, you can select a separate database
element to label on the map.
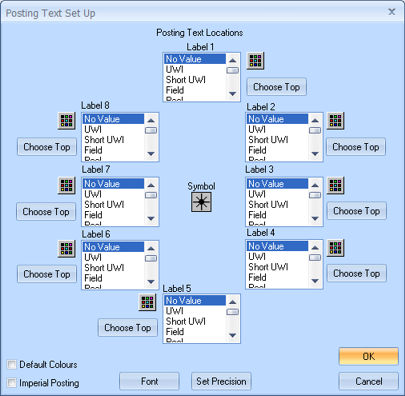
- The layout of this
dialog box is designed so that you can graphically see how your label
will appear with the symbol. For example, Label
7 is to the left of the symbol, so if you pick a field from this
list, GeoVista will display the
map label to the left of the symbol.
Follow these steps to add a label to the map:
- From the database box, in the position where you
want to show your label, select the field you want to display. (For example,
UWI.)
- If you want to change the label's text color,
click
 beside the database box and choose a new color from
the Color
dialog box
beside the database box and choose a new color from
the Color
dialog box
- If you want to label a well's formation top, click
<Choose Top> to open the
Formation
Top Posting dialog box, where you can select a formation top
from the list.
- Continue to set fields in other database boxes
if you want to display multiple labels.
- To generate your labels using GeoVista's
default label colors, select the Default
Colours check box.
- By default, GeoVista
labels all values in metric. If you want your labels to use imperial measure,
select the Imperial Posting check
box.
- Click <Font>
to open the Font
dialog box, where you can set how the text appears on all the labels.
- Click <Set
Precision> to open the Posting Precision dialog
box, where you can set how measurements appear (notation and decimal places).
- Click <OK>
to apply your settings.
What do you want to do?