On the Result
List tab toolbar, click and select Export Data | Export to ODBC to open the Export/Save Options dialog box. You can also right-click a well in the result set to open the menu.
In the Export/Save Options dialog box, select your export options, and click <OK>.
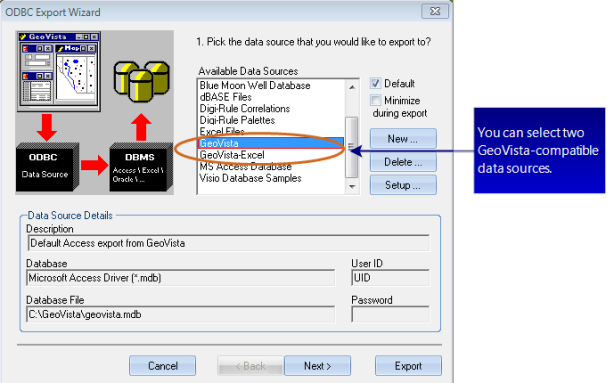
Use the ODBC Export Wizard to export your data from GeoVista. You can use two GeoVista-compatible data types:
Data Source Type
Exports To
GeoVista
Microsoft Access file called geovista.mdb
GeoVista-Excel
Microsoft Excel file called geovista.xls
You'll see other available data sources in the ODBC Export Wizard, but they aren't compatible with GeoVista. The ODBC Export Wizard displays other ODBCOpen DataBase Connectivity: a standard database access method. The goal of the ODBC standard is to access any data, from any application, regardless of the database management system (DBMS) handling the data. ODBC inserts a database driver between an application a DBMS. If both are ODBC-compliant, the database driver translates the application's data queries into commands the DBMS understands.-compatible data sources it finds on your system.
The ODBC Export Wizard is three steps. You have the option to configure your export in the wizard's three steps, or you can click <Export> at any time to export the data without setting additional options.
basic export workflow
Follow these steps to export data with the ODBC Export Wizard:
From the Available
Data Sources list, select either GeoVista or GeoVista-Excel as the data source type.
If your data source is not listed, click <New>
to create the new data source. If you do not know your data source setup
information, ask your systems administrator.
Look at the Database
File field and note the name of your export file, and the location
where GeoVista will create the file. For example, the GeoVista-Excel
data source creates a geocarta.xls
file in your PC's GeoVista directory.
If you want to change the Data Source
Details, click <Setup>.
If you want this export type to become the default
the next time you open this wizard, select the Default
check box.
If you do not want to view this wizard during
the export, select the Minimize During
Export check box.
Click <Next>
to continue to the next step of the ODBC Export Wizard.
 View image