From WinPICS, you can activate a dynamic form of VistaBridge that enables you to temporarily integrate GeoVista's database into your WinPICS basemap. From GeoVista, you can use the static version of VistaBridge to export GeoVista data into your WinPICS project. The data you export will not disappear once you disable VistaBridge, since the data has been permanently loaded into your WinPICS project.
In GeoVista, the VistaBridge link is made up of two dialog boxes that you can use to export two different data types to WinPICS. Use these dialog boxes to quickly export your GeoVista culture and well data directly into a WinPICS project. For example, your GeoVista session might have grid and culture data that you want to load into your current WinPICS project. Expand the toggles below to learn how to use the two dialog boxes to export your data to WinPICS.
 Use the WinPICS Export dialog box to export to WinPICS
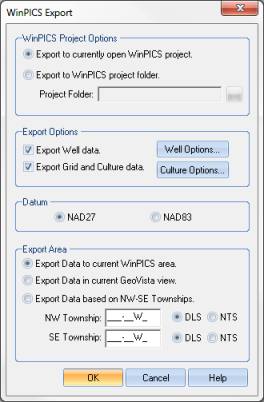
Use the WinPICS Export dialog box to export grid, culture, and well data. Follow these steps:
- On GeoVista's Main Menu bar, select File | Export to WinPICS to open the WinPICS Export dialog box.
- The VistaBridge works best when you are running at least GeoVista v4.9.1 and WinPICS v5.9.2.
- In the WinPICS Project Options field, select how you want to export the data. You can select the Export to currently open WinPICS project option if you're already running a project in the WinPICS software. GeoVista will add your data to the open WinPICS project. Or, if you don't have the WinPICS software open, can select the Export to WinPICS project folder option to export your data to a new WinPICS project. If you select this option, GeoVista will automatically launch the WinPICS software and load your selected data into the new project.
- When you launch a new project, you need to specify your zone before GeoVista will export your data to the WinPICS project.
- In the Export Options field, select the type of data you want to export. Select the Export Well check box if you want to export your project's well data, and select the Export Grid and Culture Data check box if you want to export your project's culture data (For example, grid lines, water, and transportation).
- If you are exporting well data, click <Well Options> to open the Export/Save Options dialog box, where you can select additional options for the well data type to export.
- If you are exporting culture data, click <Culture Options> to open the Select Grid and Culture Layers dialog box, where you can specify which specific culture data to export.
- In the Datum field, select the datum that your original (GeoVista) datum was in.
- In the Export Area field, choose one of the following options:
Option Description Export Data to Current WinPICS Area Select to export your data to an open WinPICS project, in the coordinates of the WinPICS project. For example, if GeoVista detects that your open WinPICS project is in latitude/longitude, it will export your data to WinPICS using the same format.
- If you chose to export well result set data from this dialog box, you may notice extra wells were exported to WinPICS. This is because the map projection in WinPICS was different than that of GeoVista when the export was performed. If you want the exact same data results exported into WinPICS, use the Export Wells to WinPICS dialog box (below).
- If you are trying to export data to WinPICS, but are not seeing the data in the Map window, you may have to update your project area in WinPICS. This is because WinPICS retains your original project area to keep your project from expanding each time you do a GeoVista import. To update your area, navigate to the Map menu bar and click Tools | Update Project Area For GeoVista.
Export Data in Current GeoVista View Export the data currently in view on the Map view to WinPICS. Export Data Based on NW-SE Townships Specify the area to export by defining the township block in NTS National Topographic System or DLS Dominion Land Survey coordinates.
- Click <OK> to start the export.
Use the Export Wells to WinPICS dialog box to export well result sets to WinPICS
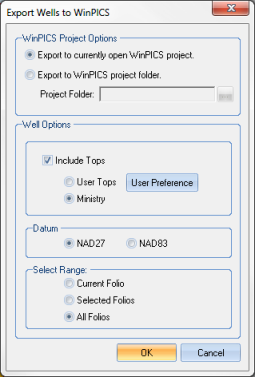
Use the Export Wells to WinPICS dialog box to export well result sets into WinPICS. Follow these steps:
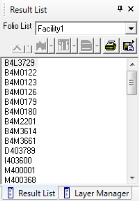
- On GeoVista's Layer Manager bar, click the Result List tab.
- In the Result
List tab's toolbar, click
 to open a shortcut menu.
 - From the shortcut menu, select Export Data | Export to WinPICS.
- The VistaBridge works best when you are running at least GeoVista v4.9.1 and WinPICS v5.9.2.
- In the WinPICS Project Options field, select how you want to export the data. You can select the Export to currently open WinPICS project option if you're already running a project in the WinPICS software. GeoVista will add your data to the open WinPICS project. Or, if you don't have the WinPICS software open, you can select the Export to WinPICS project folder option to export your data to a new WinPICS project. If you select this option, GeoVista will automatically launch the WinPICS software and load your selected data into the new project.
- When you launch a new project, you need to specify your zone before GeoVista will export your data to the WinPICS project.
- In the Well Options fields, select the Include Tops check box if you want to export tops data to WinPICS.
- If you chose to include well tops in the export, select User Tops if you want to export specific tops, including the Ministry Formation tops database created by the provincial government, or select Ministry to only export Ministry tops.
- In the Datum field, select the datum that your original (GeoVista) datum was in.
- In the Select Range field, choose one of the following options:
Option Description Current Folio Select if you want to export data for just one folio from your result list. Selected Folio Select if you want to export data for a few selected folios from your result list. All Folios Select if you want to export data for all folios in your result list.
- Click <OK> to start the export.