Open topic with navigation
Set
Max Value
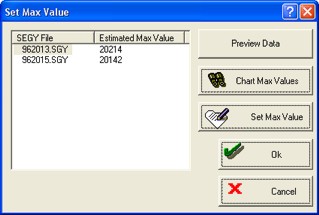
The max value function is the final step in importing floating point
data. The process is the same whether you are importing a batch of 2D
lines, a single 3D data set, or a single 2D line. The max value function
will automatically open when you click <Process
Seismic Import/Rebuild Crossing Database> in the Line Intersections and
Seismic Import Properties dialog box.  View image

The wizard scans a sample of
traces from each file and displays an Estimated Maximum amplitude for
each individual file. Click on <Chart
Max Values> to view maximum amplitude values for all the traces,
instead of just a sample of the traces. Read
more about chart max values.
Follow these steps to set the max value:
- Highlight a SEG-Y file(s) in the Set
Max Value window.
- You can highlight several files and set the max values for them all at
once. This is useful for relative amplitude preservation.
- Set the max value for the highlighted files in
one of two ways:
Chart Max Values
 Set Max Values
- Click <Set
Max Values>. You will receive a warning asking if you want to
change the max value for the selected lines.
- Click <OK>.
The Max Value
dialog box will appear.
 View image

- Type the new max value into the field, and click
<OK> to apply the scale
factors and complete your import.
- Click <Preview
Data> to view your trace clippings in the Seismic
window. This is an opportunity to look at how you clipped the data before
you actually apply the clipping. If you are not happy with how you clipped
the data, return to the previous steps and reset your max value.
- Click <OK>
to apply your clipping and return to the Line
Intersections and Seismic Import dialog box, where your import
will complete.
- Click <Finish>.
- After you import your data, you can future adjust your clipping. Access
this option by selecting from the Application
toolbar.
What do you want to do?
 View image
 View image