Open topic with navigation
Print Result
Use the Print Result
dialog box to configure how your ticket prints.
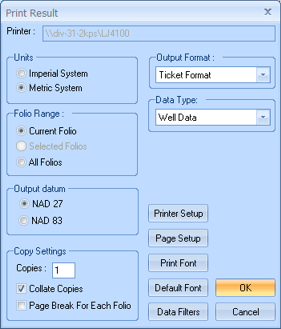
This dialog box has the following options:
- Printer
- Displays the current default printer name.
- Units
- Select in which measurement units you want to view your results (imperial
or metric).
- Folio
Range - Select if you want to print the currently selected folio,
all the selected folios (if you selected more than one), or all the folios
in the current result set.
- Output
Datum - Select NAD 27 or NAD 83 as your datum
reference. If the output datum you select differs from the datum used
in your current map, GeoVista
converts the coordinates using Divestco's common coordinate conversion
library.
- Copies
- Set how many times you want to print your results.
- Collate
Copies - Select this check box if you want the printer to keep
together the pages of multi-page printouts.
- Page
Break for Each Folio - Select this check box if you want each folio
to print out on its own page.
- Output
Format - Select how you want to format the results. For example,
if you only want to see a summary of your results, select Summary
Format.
- Data
Type - Choose which portion of the ticket you want to print. For
example, if you only want to see a well's core data information, select
Core Analysis from this list.
- <Printer
Setup> - Click to open the Print
Setup dialog box, where you can configure your printer.
- <Page
Setup> - Click to open the Page Setup dialog box, where
you can configure your paper size, etc.
- <Print
Font> - Click to open the Font
dialog box, where you can configure how the text appears in the printout.
- <Default
Font> - Click to set the font back to the GeoVista
default print font (Courier New, Regular, 8).
- <Data
Filters> - If you selected Production
Data as your Data Type,
then you can click this button to open the Production Data Save
Options dialog box and configure the output.
What do you want to do?