Open topic with navigation
Import 2D Survey
You can import a SEG-P1 format survey file to replace a line or create
a new line in your project. Follow these steps:
- On the Application toolbar, select
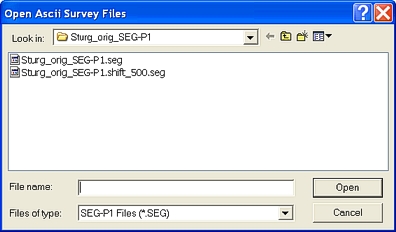
 to open the Open
Ascii Survey Files dialog box.
  View image

- In the Look in field, browse to the location of the ascii file that you want to use to
create a new line.
- Select the file. It should have a .seg or .sp1
suffix.
- Click <Open> to open the Define ASCII Format dialog box, where you can define a format so WinPICS can properly read the well
tops data, the shotpoints and X/Y coordinates, or the well-spot data from your ascii file.
- Click <OK> on the Define ASCII
Format dialog box to open the Confirmation dialog box.
 View image

- Click <Yes> if you want to perform a coordinate conversion in the Project Conversion Parameters dialog box. Click <No> to open the Select
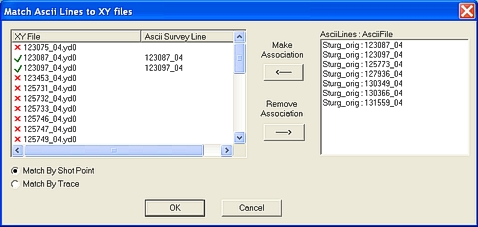
Survey Line dialog box, where you can associate lines in the Ascii file with the lines in your project.
 View image

WinPICS will try to automatically
match up lines in the Ascii file with the corresponding line in your project.
The XY File/ Ascii Survey Line field displays the XY files for the lines in your project, alongside any Ascii
survey lines that WinPICS associates
with them.
You can also associate Ascii files with your
project files manually. Follow these steps:
- Select a line in the Ascii Lines : AsciiFile field. WinPICS highlights the line.
- In the XY File field, select a file from your project. WinPICS highlights the line.
- Click the Make Association arrow button to associate the two highlighted lines.
WinPICS displays the Ascii file line under the Ascii Survey Line field alongside the XY file line and marks the associated XY file with
a check mark.
You can remove an association so WinPICS
will not import the selected Ascii lines. Follow these steps:
- In the XY File
field, select an associated file. An associated file has a check mark
beside it.
- Click the Remove
Association arrow button to remove the association between the selected XY file and the Ascii line.
This dialog box also has the following options:
- Match
By Shot Point/ Match By Trace
- Select one of these options to match the Ascii files and project XY
files by shot points or by trace.
- <OK> - Click to complete the import. When
complete, WinPICS will import
the data into your project and return you to the Map view.
What to you want to do?
 | Survey
| 2D to open the Open
Ascii Survey Files dialog box.
  View image
 | Survey
| 2D to open the Open
Ascii Survey Files dialog box.
  View image
 View image
 View image