Open topic with navigation
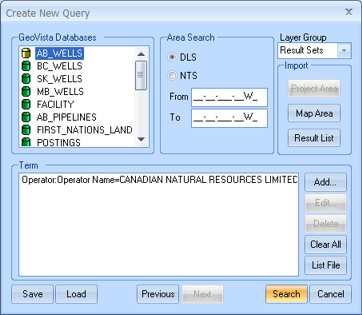
Create New Query
To open the Create
New Query dialog box, select Query
| New Query from the Main Menu bar. Use this dialog box
to build searches based on specific criteria. The results of the search
displays as a list on the Object
Manager's Result List tab.
- Each search requires either an area to search on, a term to search on,
or both.
This dialog box has the following options:
- GeoVista
Databases - Select the data set that you would like to search.
If you want to see well or production information, select the provincial
well database that will coincide with your area of interest.
- Area
Search - Specify the area range (From
and To) that you want to search
(in the NW to SE fashion), as well as which survey system to use (
or ).
Alternatively, you can click <Map
Area> to set the search to only the area currently displayed
in the Map View,
or click <Result Set> to
only search a current result list. If you select none of these options
and leave the area fields empty, GeoVista
will search all areas associated with the data set.
- Layer
Group - This list displays all the folders currently on the Layer
Manager tab. As well, this list has a Results
Sets option (the default location to store your query results),
and a New Folder option. When
you click <Search> to generate
your results, GeoVista stores
your new layer under the folder name you selected. If you choose Results Sets, GeoVista
creates a folder with that name in the Layer
Manager tab, and then stores your layer in that folder. If you
want to store your new layer in a different folder, type a new name in
the Layer Group field.
- <Map
Area> - Click to populate the From
and To fields, based on the viewable
extents of your map.
- When you click <Map Area>,
GeoVista will display a message
if your area spans both and locations.
- <Result
List> - Click to set your search to look through the results
of a current result list on the Result List tab. If you try to
import a result type that does not exist on the Result
List tab, you will see a message.
- Term
- This window displays all the filters you added to the query, including
those from <Result List>
and those from <Add>. You
can right-click on any filter in this window to open the Term's
shortcut menu.
- <Add>
- Click to open the Term Builder dialog box,
where you can add filters to your query.
- <Edit>
- Select a filter in the Term
window, and then click to open the Term Builder dialog box,
where you can change the filter's settings.
- <Delete>
- Select a filter in the Term
window, and then click to remove that filter from the query.
- If your filter is associated with an (For example, And),
you need to drag and select the filter and the together before
the <Delete> button will
activate. When you delete a filter, you must delete its operator.
- <Clear
All> - Click to remove all filters from the Term
window.
- <List
File> - Click to load a previously saved query result set.
- <Save>
- Click to save your current query to a folder on your PC. This is a good
idea if you frequently perform the same complicated query.
- <Load>
- Click to load a previously saved query.
- <Previous>
and <Next> - Click to view
other queries you made in your current GeoVista
session.
- <Search>
- Click to perform the query.
- <Cancel>
- Click to cancel the query creation.
What do you want to do?