Open topic with navigation
You are here: Working in the Map window > Object Manager > Object Manager Layers Tab
Layers Tab
 View image
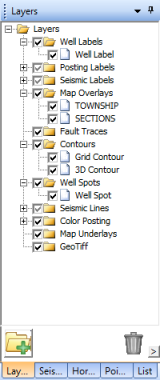
The Layers tab
of the Object Manager enables you to choose which map layers to activate and display, and the order in which
to display them.
About the layers tab
The layers are grouped into folders, which you can arrange and rename as needed. When working in the layers tab, folders and layers are referred to collectively as items. A folder can contain layers, and it can also contain other folders.
Using the layers tab
Having a check mark for the item not only shows you that data on the map, but it also makes the data active within your project. This means, clearing the check box will "hide" the item from data calculations and comparisons that you do, as well as hide it on your map. View check box options.
- View
All Items -To quickly activate all the items in a folder, select
the folders check box. This automatically selects the check box for each item in that folder, which sets those items to display in the map window.
- Hide
All Items - To quickly hide all the items in a folder, clear
the folder's check box. This automatically clears the check box for each
item in that folder, which hides those items from the map view.
- View Some Items - To view some of the folder's items in the map window, open the folder and only select the check box(es) for the item(s) you want
to see. The folder's check mark will appear dimmed to signify that only some of its items are selected. To hide an item from the project, clear the check box for that item.
- The map layers appear on the tab in the order that they
will be displayed, with layers at the bottom of the list being displayed
first.
You can work with this tab in the following ways:
For organizational reasons, you might want to create
custom folders to store specific layers. To create a new folder follow
these steps:
- Click the
 button at the bottom of the Layers tab.
- Type a unique name that will describe the contents
of the new folder.
- A
new folder must contain a minimum of one layer in order for ProductName to save
the folder in the list. Any folder not containing at least one layer will
be automatically removed from the list when you close the project.
Greeking is a drawing technique that removes extraneous information from your map. ProductName automatically sets the greeking scale for well spots and points. Those objects will shrink, and then disappear altogether, as you zoom out in your map scale. To open the Set Greeking Scale dialog box, follow these steps:
- In the Map window, click the Layers tab of the Object Manager.
- Expand the Map Overlay folder.
- Right-click on a layer and select from the drop down menu. The Set Greeking Scale dialog box will open.
You can customize the scale at which map overlay layers will disappear from your map. Follow these steps:
- In the Map window, click the Layers tab of the Object Manager.
- Expand the Map Overlay folder.
- Right-click on a layer and select from the drop down menu to open the Set Greeking Scale dialog box.
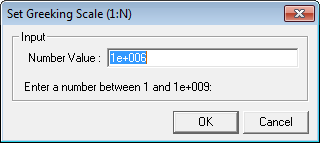
- In the Number Value field, type the scale at which you want ProductName to stop displaying the field you selected. You can type the scale in standard numeric format (1000000), or in abbreviated numerical format (1e+006). For example, if you set the scale value as 1e+006, ProductName will not display that layer in the Map view when the map scale is set to 1:1000000 or higher.
- Click <OK> to close the dialog box and apply the greeking to your map.
Use the defaults menu of the layers tab
The menu enables you to save, load, and create layer order templates. This means you are able to quickly load a system or project default layer order, save a new layer order as your project's default, and save a custom layer order as a template for later use. Expand the toggled sections below to learn more about each of these options. Click here to learn how to open the defaults menu
At the bottom of the Layers tab, click  to open the menu.

Reload layer tab system defaults
You can customize the configuration of your layers by deleting, renaming, moving folders, or making other changes. However, at some point you may want to return the Layers tab to its default state at install. Follow this step:
- From the menu, select . A warning message displays, asking you to confirm that you want to restore the defaults.
- Click <OK> to confirm the restore. Any customization of the folder structure for this project will be deleted.
Save layer tab project defaults
You can customize the configuration of your layers by deleting, renaming, moving folders, or making other changes. At some point, you may want to save the Object Manager configuration so it will be the default any time you, or another user, opens your project. Follow this step:
- From the menu, select . A warning message displays, asking you to confirm that you want to save the current layer tree as your new project default.
- Click <OK> to confirm the save. Any customization of the folder structure since you last saved it to the project will be applied, and this will be the new project default.
- GeoVista layers are only temporary files and cannot be saved as project defaults. GeoVista layers are displayed in the Layers tab when you enable VistaBridge.
Reload layer tab project defaults
You can customize the configuration of your layers by deleting, renaming, moving folders, or making other changes. However, at some point you may want to return the 's Layers tab to a state that you saved to this project. Follow these steps:
- Make sure you have saved a configuration as a project default at some point.
- At the bottom of the Layers tab, click to open the menu.
- Select . A warning message displays, asking you to confirm that you want to restore the defaults. If you confirm the restore, any customization of the folder structure since you saved it to the project will be lost.
Save current layer order as template
You can save the order of your layers as a template to be used over again in other projects. This is useful if you are working with the same data for multiple reasons, and you want to be able to quickly change the layer order. Follow these steps:
- Arrange your layers in the order you want them saved.
- At the bottom of the Layers tab, click to open the menu.
- Select , the Save As dialog box will open.
- Name your layer, and click <Save>.
Load layer order template
Once you have saved templates of your layer order, you can load them into the Layers tab. Follow these steps:
- From the menu, select , the Open dialog box will open.
- Select the layer order template you want to use, and click <Open>.
What do you want to do?