Open topic with navigation
You are here: Working in the Map window > Post Data in the Map Window > Post Time or Amplitude
Post Time or Amplitude
 View image
How to open the post time/amplitude dialog box
On the bar, select (or press.<p> on your keyboard). Or, on the Posting Status toolbar, select <<Multiple>> from the list of events.
- The name of the this dialog box depends on whether you are posting time or amplitude. The functionality is the same. By default, ProductName is set to post time. Read more about posting amplitude.
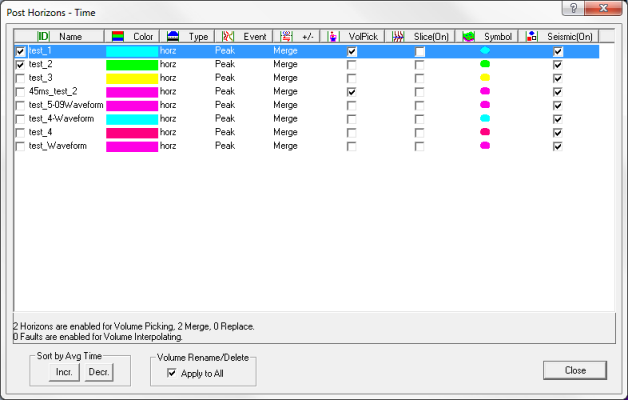
Post time or amplitude
Use the Post Time/Amplitude dialog box to post multiple horizons or faults. This dialog box lists the horizon and fault information
under the following column headings:
In your map, ProductName will post all the horizons/faults with a selected ID check box. To post or to turn off a currently posted horizon, double-click the horizon's corresponding ID check box. To post multiple events to the map, select more than one horizon's ID check box.
- - By default, all the horizons and faults in your database are displayed on your seismic. To choose to have only a subset of these horizons/faults displayed on your seismic, select only the check boxes you want to display.
- - The attribute posted will depend on your setting for posting. If no posting setting has been made, time will be posted by default.
This column displays the available horizons and faults in your database. To change the name of a horizon or fault, double-click the name to make it editable. Then, type in the new name. ProductName automatically saves any changes you make.
- Click the Name header to sort the column.
In this column, you can select the horizon/fault colors for drawing on the seismic, horizon, and time slices. To change a color of an event, double-click on its color box to open the Choose Color For dialog box, and select a new color.
This column indicates if the event is a horizon or a fault.
- You cannot change an existing horizon to a fault or vice versa. If an event is incorrectly defined, you must select the event and then press <Delete> on your keyboard to remove the event. Then, click <New> to define a new horizon or fault.
This column displays the event type. .
This column displays the merge/replace setting, which controls whether auto, lateral, and volume picking will keep, or replace existing picks.
- - When a horizon is set to Merge, auto and lateral picking keep the existing picks and merges them with the new picks. 3D volume picking incorporates existing picks into its guide line.
- - When a horizon is set to Replace, auto and lateral picking disregard existing picks and replace them with new picks. 3D volume picking replaces existing picks.
- If ProductName is in auto, lateral, or volume picking mode, the Status bar in the upper left-hand corner of the Seismic window will display the merge/replace setting .
- The merge/replace setting does not apply to faults. 3D Volume Fault Interpolation always replaces existing fault markings.
You can change the merge/replace setting using either of the following methods:
- Click anywhere in the Seismic window to make it active and press <Alt> + <m> on your keyboard, or
- From the Edit Properties dialog box or the Post Time dialog box, double-click Merge or Replace (located under the +/- column) to change the setting.
Use this column to enable volume picking. Double-click the event's corresponding VolPick check box to turn on volume picking for that event.
Use this column to draw an event in the Map window on your horizon and time-slices. To do this, double-click to select that event's Slice(On) check box.
This column displays the symbol that represent the horizon/fault's intersections on the horizon and time-slices. To change the symbol, repeatedly double-click the current symbol to cycle through the list of possible symbols. Stop double-clicking once you arrive at the symbol you want to use.
Use this column to draw an event on your seismic data. To do this, double-click to select that event's
Seismic(On) check box.
This dialog box also features the following options:
Below the horizons and faults, you can view a summary of the number of horizons and faults enabled for volume picking and volume interpolation. You can volume pick more than one horizon, or interpolate
more than one fault each time you open this dialog box. Since you could inadvertently overwrite
horizon picks or fault markings from a previous operation, it is important
to double check this summary.

Use the buttons in this section to select how to sort your horizon or fault database. Click <Incr.> to sort your
horizon or fault database by increasing time (shallow to deep), or <Desc.>
to sort by decreasing time (deep to shallow).
Right-click on a horizon or fault to open a shortcut menu where you can
or delete that horizon or fualt. If you select the Apply to All check box first, ProductName will rename
or delete all the horizons or faults you select. If you clear the Apply
to All check box, ProductName enables
you to rename, or delete horizons or faults for specific volumes.
- You can also rename, delete, or hide horizons from a specific volume
by right-clicking on the horizon annotation on the side of your seismic
section.
- ProductName automatically saves any changes you make in this dialog box.
What do you want to do?