Open topic with navigation
You are here: Working in the Map window > Object Manager > Horizon Tab
Horizon Tab
 View image
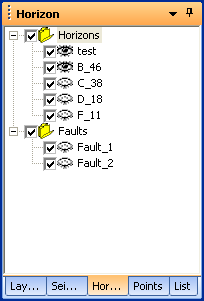
The Horizon tab
of the Object Manager enables you to group horizons or faults together, and work with them as a
group in your map.
About the horizon tab
You can turn groups of horizons and faults on or off together, or rename or delete
them as a group. You can also use this tab to select the order that the horizons and faults are drawn on your map. The horizons and faults appear on the tab in the
order that ProductName displays them
in the Map
Window, with those at the bottom of the list being displayed first. If
you rearrange items in the Horizon tab (see Move Folders and Items
below), ProductName displays them
in the Map Window in the new order.
Horizon tab options
The Horizon tab has two different controls you can use to manage your data , the eye icon ( ) and the check box. These controls function together, and make hiding and displaying horizons quick, while enabling you to choose what data to display in your map and to activate in your project.
Having two different controls to manage horizon data is particularly helpful when working in large products with many horizons and faults loaded. The dual controls enable you to show the horizon(s) in your seismic view, without having them displayed on the map, and vice versa.
Learn about the check box options
- View
All Items -To quickly activate all the items in a folder, select
the folders check box. This automatically selects the check box for each item in that folder, which sets those items to display in the map window.
- Hide
All Items - To quickly hide all the items in a folder, clear
the folder's check box. This automatically clears the check box for each
item in that folder, which hides those items from the map view.
- View Some Items - To view some of the folder's items in the map window, open the folder and only select the check box(es) for the item(s) you want
to see. The folder's check mark will appear dimmed to signify that only some of its items are selected. To hide an item from the project, clear the check box for that item.
Learn about the eye icon options
-
and selected check box - Your horizon or fault will appear on the map, and the data will be active in the project.
-
and cleared check box - Your horizon or fault will not appear on the map, and the data will be inactive in the project.
-
 and selected check box - Your horizon or fault will not appear on the map, and the data will be active in the project.
-
and cleared check box - Your horizon or fault will not appear on the map, and the data will be inactive from the project.
Use the horizon tab manager
- In the Object Manager, click the Horizon tab.
- Expand the folder for the horizon group you want to view.
- Select the check box(es) of the horizon(s) or fault(s) whose data you want to activate in your project.
- Double-click the eye icon(s) of the horizon(s) or faults(s) you want to show on your map.
- You can quickly display multiple horizons or faults in your Map view using the right-click menu in the Horizon tab. To select multiple horizons, hold <Shift> or <Ctrl> on your keyboard and click on the items you want. Right-click in the Horizon tab to open a menu, and select either or .
You can also work with this tab in the following ways:
What do you want to do?