Open topic with navigation
Import Seis-X / SeisWare Projects
Use this import tool to convert seismic data and interpretation from
Seis-X or SeisWare
projects into WinPICS projects.
- You need to import grid, wells, and culture data from their source files.
Follow these steps to import data from a Seis-X
or SeisWare project:
- From the Application toolbar select
 | to open the Divestco Import
dialog box.
  View image

- Click
 to open the Browse
for Folder dialog box, and locate your Seis-X/SeisWare
project directory. Click <OK>
to import the project into the Divestco
Import dialog box.
- WinPICS
will automatically detect
the project format as Seis-X
or SeisWare.
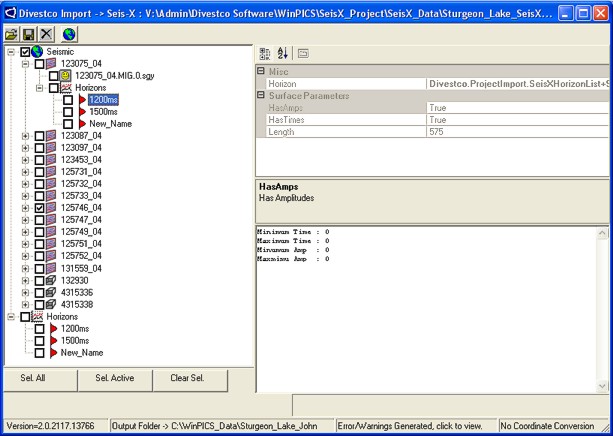
- WinPICS will display the project's contents in its main window (Read more). Select the check box of each seismic line, horizon, and fault
that you want to import into your project.
- The Divestco Import
dialog box also has three buttons to help you quickly select seismic components. Click <Sel All> to select all the check boxes; click <Sel Active>
to select only the active seismic data, horizons, and faults; or click
<Clear Sel> to clear all the check boxes at once.
- If necessary, click
 to open the
Project
Conversion Parameters dialog box, where you can change the Seis-X/SeisWare project's datum
or projection to match your current project.
- Click
 to import your Seis-X/SeisWare
project into your WinPICS project;
WinPICS will copy your imported
seismic to the same directory as your current WinPICS
project. You can watch the status of the import at the bottom of the Divestco Import
dialog box. The length of time required for the import depends on the
amount of data you selected to convert. When the import completes, WinPICS will display the message Import Complete.
- If you want to cancel the import, click
 .
.
- Click the <X>
in the upper right corner of the dialog box to close the Divestco
Import dialog box. WinPICS will open the Rebuild 2D Intersection
Lines dialog box. Accept the default settings and click <OK> to continue.
- You must perform a rebuild in order to see the new 2D lines on the basemap.
- When WinPICS
opens the Update
Project message box, click <Yes>
to complete the update.
What do you want to do?
 | Import
Seis-X / SeisWare Projects to open the Divestco Import
dialog box.
  View image
 | Import
Seis-X / SeisWare Projects to open the Divestco Import
dialog box.
  View image
 to open the
Project
Conversion Parameters dialog box, where you can change the Seis-X/SeisWare project's datum
or projection to match your current project.
 to import your Seis-X/SeisWare
project into your WinPICS project;
WinPICS will copy your imported
seismic to the same directory as your current WinPICS
project. You can watch the status of the import at the bottom of the Divestco Import
dialog box. The length of time required for the import depends on the
amount of data you selected to convert. When the import completes, WinPICS will display the message Import Complete.
 .
.