Open topic with navigation
Accumap Imports
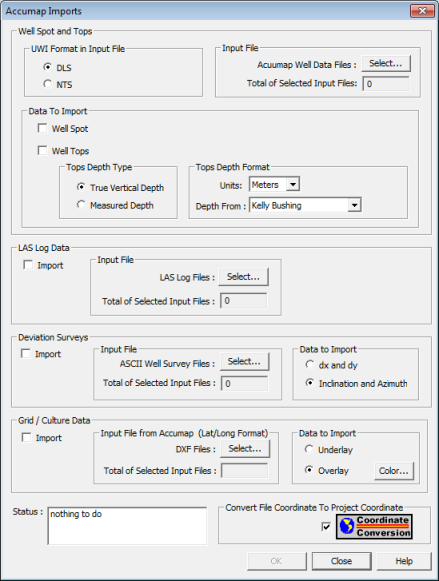
Use the Accumap
Imports dialog box to select and configure ASCII file imports. This dialog box opens from the ASCII Import menu in the Well Spot Database
dialog box. You can import files separately, or you can select all the
files you want to import, then import them together at once.  View image

This dialog box has the following options:
 Input Format
To select well spot or well tops (AXP) files for import, follow these steps:
- Click <Select>
to open the Select
ASCII File to Import dialog box.
- Browse your directory
and select the AXP files you want to import.
- Click <Open>.
The dialog box displays the input options.
 View image

- UWI Format in Input File
- Displays which coordinate system WinPICS will use for the well spot or well tops file.
- Total of Selected Input
Files - This field has a number indicating how many well spot or well top files
you selected to import.
 Data to Import
Select which kind of data to import. You can select Well Spot or Well Tops  View image

You have
the following options for configuring your well tops depth format:
- Tops Depth
Type - Select True Vertical Depth
or Measured Depth for your depth
type.
- Tops Depth Format - Select a unit of measurement for depth, and a depth reference for elevation.
 LAS Log Data
To select LAS files for import, follow these steps:
- Click <Select>
to open the LAS Log
Files dialog box.
- Browse your directory
and select the LAS files you want to import.
- Click <Open>.
The LAS Log Data area of the Accumap
Imports dialog box is changed.
 View image

- Include
- This box is selected to indicate LAS will be included in this import.
- Total of Selected Input
Files - This field has a number indicating how many LAS files you
selected to import.
 Deviation
Surveys
To select deviation survey (CSV) files for import, follow these steps:
- Click <Select>
to open the ASCII
Well Survey Files dialog box.
- Browse your directory
and select the CSV file you want to import.
- Click <Open>.
The Deviation Surveys area of
the Accumap Imports
dialog box is changed.
 View image

- Import
- This box is selected to indicate deviation survey will be included in
this import.
- Total of Selected Input
Files - This field has a number indicating how many CSV files you
selected to import.
- Data to Import - You can select either dx
and dy or Inclination and Azimuth
as the type of data in the survey file you are importing.
 Grid/
Culture Data
To select grid or culture (DXF) files for import, follow these steps:
- Grid/Culture import works only when the grid and culture from the Accumap
file is in lat/long. If the DXF file is in coordinates, then you should
perform the grid/culture import using
| Import Map Overlays | .
- Click <Select>
to open the DXF Files
dialog box.
- Browse your directory
and select the DXF files you want to import.
- Click <Open>.
WinPICS opens the Grid/Culture
Color Selections dialog box, where you can select colors for your
grid and culture layers.
- The default color for
your layers is black. Click a black bar under the Color
heading to open the Color dialog box, where you can select a different color for this layer.
- Click <OK>
to close the Color
dialog box.
- Click <OK>
to close the Grid/Culture
Color Selections dialog box. The Grid/Culture Data area of the Accumap Imports
dialog box shows the following:
 View image

- Import
- This box is selected to indicate grid or culture will be included in
this import.
- Total of Selected Input
Files - This field has a number indicating how many DXF files you
selected to import.
- Data to Import
- Select which layer to make this import on your map. If you select Underlay,
WinPICS displays your grid or
culture as the bottom layer on your map. If you select Overlay,
WinPICS displays your grid or
culture between the Seismic Labels
and Contour Marking layers of
your map.
- <Color>
- Click to open the Grid/ Culture Color
Selections dialog box, where you can select colors for your grid
and culture layers.
 Status
When you select <Import>
to import your files, WinPICS
will display a message here if you missed steps or selections in the Accumaps Import dialog box.
 Coordinate Conversion
Coordinate
Conversion - Select this check box to indicate that WinPICS
will convert the AXP file from lat/long to UTM coordinates.
 Import
Click <OK> to import
files for all import types which have a check in their Include
boxes. WinPICS may display some
of the following dialog boxes as it imports your data:
- Project
Conversion Parameters
- Warning
- Wells Already Have
Tops Imported
- Associate Selected
Wells with Tops
- Associate
Tops with Horizons
- Associate Selected
Wells with LAS Files
- LAS Import Options
- Define Synthetic Panels
- Associate Selected
Wells with Survey Wells
- Well Survey Import
Options
Select the appropriate options in each
dialog box. WinPICS displays
your imported data in the Well
Spot DataBase dialog box. Click <Save>
to save your imported data.
What do you want to do?
 View image
 View image
 View image
 View image
 View image
 View image
 View image