Open topic with navigation
Screen Selection
Use the Screen
Selection tab on the Select Print Area dialog
box to set what to print from your current Map View.
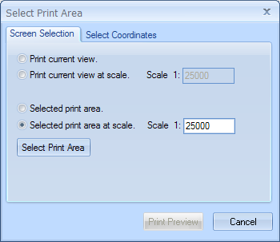
This tab has the following options:
- Print
Current View - Sets the area to print exactly what you see in the
current Map view, at the current
scale. If your area previews smaller or shorter than the paper size in
your template, GeoVista will automatically add the
extra area to fit the paper.
- Print
Current View at Scale - Sets the area to print at the exact center
point of the current view, at the scale you specify. GeoVista
will add extra area, if necessary, to fill the paper size of your template.
However, your current area will always remain in the exact center of the
page.
- Selected
Print Area - Enables you to use your cursor to draw a box around
the area you want to print. If your print box is different than the set
page size of your template,
GeoVista will add the extra area
around your box to fit the paper. Read
more.
- Selected
Print Area at Scale - Enables you to set your cursor to a specific
zoom size, and then to choose a location on your map area at exactly that
size. If necessary, GeoVista
will zoom your area to fit your template's
paper size, instead of adding extra area. Read
more.
- If your cursor box
is oddly large, then your current scale is not compatible with the current
template's paper size.
- <Select
Print Area> - Click to open the GeoVista Print Layout Tool, where
you can preview the print job, edit the print options, and send your map
to your printer. This option is only available if you chose the Selected Print Area or Selected
Print Area at Scale option.
What do you want to do?