Open topic with navigation
Seismic Plot Display Options for Seismic Interpretation
 View image
How to open the seismic interpretation tab
- On the menu bar, select or to open the Print to Windows Device dialog box.
- In the Display Options section, click <Edit> to open the Seismic Plot Display Options dialog box.
- Click on the Seismic Interpretation tab.
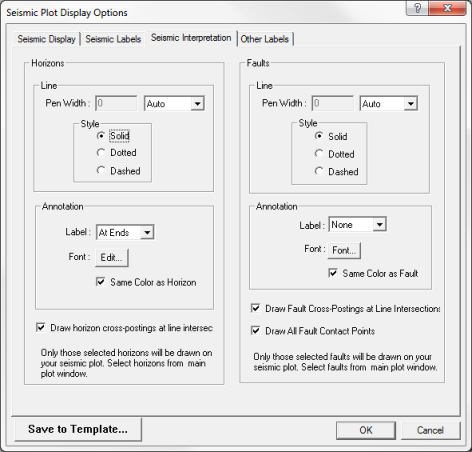
Use the Seismic Interpretation tab to control the appearance and annotation of horizons, faults, and cross-postings at line intersections.
This tab has the following options:
Horizons
Customize the appearance and annotation of horizons and horizon intersections.
-
– Select a line width in inches, millimeters (mm), microseconds (us), milliseconds (ms), or pixels. Select ‘Auto’ to have WinPICS pick a reasonable width based on the plot scale.
-
– Select solid, dotted, or dashed for the horizon line style.
-
– Select to annotate horizons at the ends of the line (in the margins of the display), in the center of the plot, or not at all. Click <Font> to change the default font, font style, or font size. Select the Horizon Color check box to label the horizons in the same color as the horizon.
-
– Select this check box to enable horizon cross-postings at line intersections.
- The horizons drawn on your seismic plot are determined by the horizons drawn on the section when you selected the Scaled Window Plot or Scaled Template Plot functions. Alternatively, you can select the horizons you wish to draw on the plot in the main Scaled Window Plot or Scaled Template Plot windows by clicking on Select Horizon/Faults.
Faults
Customize the appearance and annotation of fault and fault intersections.
-
– Select a line width in inches, millimeters (mm), microseconds (us), milliseconds (ms), or pixels. Select Auto to have ProductName pick a reasonable width based on the plot scale.
-
– Select solid, dotted, or dashed for the fault line style.
-
– Select to annotate faults at the ends of the line (in the margins of the display), in the center of the plot, or not at all. Click <Font> to change the default font, font style, or font size. Select the In Fault Color check box to label the faults in the same color as the fault.
-
– Place a check mark to enable fault cross-postings at line intersections.
-
– Place a check mark to draw all fault contact points on the plot.
- The faults drawn on your seismic are determined by the faults drawn on the section when you selected the Scaled Window Plot or Scaled Template Plot functions. Alternatively, you can select the faults you wish to draw on the plot in the main Scaled Window Plot or Scaled Template Plot windows by clicking on Select Horizon/Faults.
What do you want to do?