Open topic with navigation
Synthetic Generation
WinPICS displays synthetics
and well logs on the fly from LAS files. This allows you to
add, edit and delete panels and well logs.
- Before associating a LAS file, assign your Default Synthetic Filter Panels in Project Preferences.
- WinPICS requires all curves to be in the same
input file.
- Check the mnemonic used to define the sonic log
in the LAS file to be sure that it is included in your WinPICS Lookup Tables (LUT).
- A Batch LAS import is done by selecting multiple
well-spots, and multiple input LAS files. Associations will be made automatically
if the UWI of the well-spot is defined in the UWI or LOC
fields in the LAS files. ( 00/06-35-083-11W6/3 = 00063508311W63 )
Step 1. Associating the LAS Files
These instructions assume you already have a well spot for your synthetic. To annotate log tops in time on your
synthetics they can be included in the LAS file, or hand entered.
Follow these steps to associate the LAS files:
- From the Application
Toolbar select
 |Well
Database. The Well Spot Database dialog box opens.
- Highlight the well(s) for which you
wish to generate a synthetic.
- Click on ASCII
Import|Well Logs (LAS)…(If
the well does not exist, see Importing Well-spots.)
- Browse to your source
LAS file(s) (Use the <Shift>
or <Ctrl> keys on your keyboard
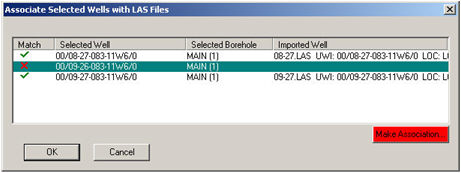
for multiple selections) select the files and click <Open>. WinPICS will automatically cross reference
the LAS files to the well-spot(s)
based on the UWI within the file.
 View image

- To manually associate
the file, select a well
spot and click <Make Association>.
- Select the correct matching survey record and click <OK>.
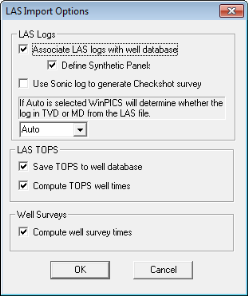
- Select
<OK> once again to continue. The LAS
Import Options dialog box opens.
 View image

- Select import options.
- Select <OK>to continue with the options selected
Alternative method to make LAS association
You can also use the following method to make an LAS association:
- Select
 |
on the Map toolbar.
- Click on the well you want to use.
- In the Edit Well-spot dialog box, select
.
WinPICS
enables you to import LAS files to well spots without a synthetic generated. As a result, your Map view indicates which well spots have a generated synthetic and which ones don't. A well with a synthetic created is surrounded by a rectangle, and a well without a synthetic created is surrounded by a circle.
- Circled well symbols can't be selected in a fence or a synthetic window, but you can be select and export them to LogEdit for viewing, editing, and comparison of non-geophysical curves.
- To re-associate LAS files to create a correct synthetic file, you must make additions to the appropriate LUT file. If you want to change the LAS file, first delete the association of the LAS files with the well spot, edit the original LAS file, and re-associate that file with the well spot again.
Step 2. Defining the Synthetic Panels
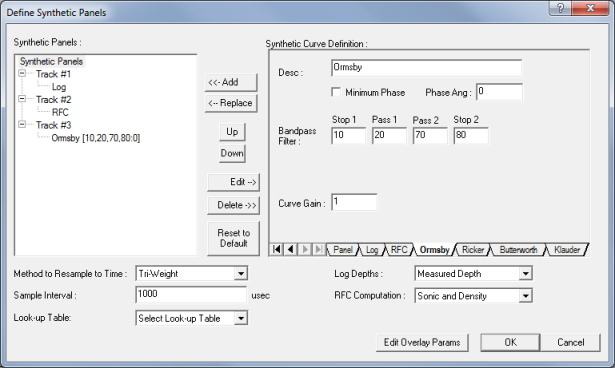
The Define Synthetic Panels dialog box will
open. On the left-hand side of the window, the following tracks have been
automatically generated from the LAS file.
- - Generated as the inverse of the sonic log.
- - Generated from the density log (if available).
- - Generated from the velocity and density logs.
- - Generated from the sonic log (added by default if
the filter was assigned in project preferences.)
 View image

- If you have defined your default panels in Project
Preferences, they will appear as tracks in the Synthetic Panels
list. To add individual logs as tracks continue to step 3.
If no filter panel is displayed in the list, complete the Adding
Synthetic Panels section below.
Adding Synthetic Panels
- Select the tab for one
of the following filters:
- Ormsby
- Ricker
- Butterworth
- Klauder
- The phase angle allows
you to apply a phase correction to the synthetic panel. Enter a value
in degrees for the phase angle. The default value 0 implies
that no correction is to be applied.
- The curve gain factor
allows you to apply amplitude scaling to the synthetic panel. Enter a
factor for the curve gain. The default value 1 implies no
gain will be applied.
- Modify the default filter
parameters if required.
- Click the <<-Add
button to add a new synthetic panel track.
- To create multiple panels,
continue by modifying the filter parameters and clicking <<Add.
You can also define well logs along with the synthetic. To add well logs, continue to step 3.
- If you don't need to add logs, select <OK> and
continue to step 4.
Step 3. Defining the Well Logs (Optional)
Well logs from the LAS file such as sonic logs can be displayed independently,
or along with the synthetic panels. Follow these steps:
- Select the LOG
tab from the Define Synthetic Panels window. All the logs from the LAS
file will appear in the pull down menu next to Log
Curve.
- Select a log from the list and click <<-Add
to generate a new panel track.
- Select <OK>to continue.
Step 4. Associate TOPS with Horizons
Well tops names are associated with WinPICS horizon names. When you post
or grid data for a horizon, WinPICS makes the well data for associated
tops names available. Refer to the section Associate Horizons for a detailed explanation on cross-referencing well tops and horizons.
What do you want to do?
 |Well
Database. The Well Spot Database dialog box opens.
 |Well
Database. The Well Spot Database dialog box opens.
 View image
 View image
 |Well-spot
on the toolbar.
 View image