Open topic with navigation
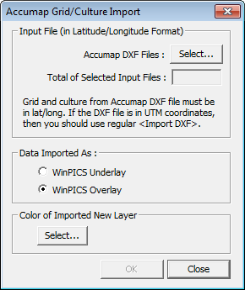
Accumap Grid/Culture Import
 View image

 How to open the accumap grid/culture import dialog box
- In the Application toolbar, select to open the Well Spot Database dialog box.
- Click <Import ASCII> and select .
Follow these steps to select and configure Accumap grid and culture (DXF) files
to import into the Well Spot Database:
- Grid/Culture import works only when the grid and culture from the Accumap
file is in lat/long. If the DXF file is in coordinates, then you should
perform the grid/culture import using
| Import Map Overlays | .
- In the Input File section, click <Select...>
to open the DXF Files
dialog box.
- Browse your directory
and select the DXF files you want to import and click <Open>.
WinPICS opens the Grid/Culture
Color Selections dialog box, where you can select colors for your
grid and culture layers.
- The default color for
your layers is black. Click a black bar under the Color
heading to open the Color dialog box, where you can select a different color for this layer.
- Click <OK>
to close the Color
dialog box.
- Click <OK>
to close the Grid/Culture
Color Selections dialog box.
- In the Accumap Grid/Culture Import dialog box, the field below the <Select> button displays the number of DXF files you selected to import.
- In the Data Imported As section, select which layer to make this import on your map. If you select Underlay,
WinPICS displays your grid or
culture as the bottom layer on your map. If you select Overlay,
WinPICS displays your grid or
culture between the Seismic Labels
and Contour Marking layers of
your map.
- In the Color of Imported New Layer section, click <Select...> to open the Grid/ Culture Color
Selections dialog box, where you can select colors for your grid
and culture layers.
- When finished, click <OK> to close the Grid Culture Color Selections dialog box.
- In the Accumap Grid/Culture Import dialog box, click <OK> to import the data to the Well Spot Database.
What do you want to do?
 View image
 How to open the accumap grid/culture import dialog box